
The scene you see above was captured in the Polish mountain region of Zakopane, during last summer. I have written before about the revealing of the landscape from the clouds, just as we made it to our planned destination. It seemed quite a miracle in a way, considering it had been nothing but dense fog on the way up, but even still, this moment was temporary and fleeting. There was another lake we really wanted to visit known as 'Mirror Lake' (it is a very common image on postcards of Zakopane), and we made it there late in the day, but the dense fog never left the lake, so there was no great surprises twice that day. All my pictures there are just a bit of water and stones, behind a massive layer of clouds.
For the photographers out there, you probably guessed that this was taken from a single RAW image. I had taken many bracketed shots in this location, but with the dynamic range able to be captured in a single image, you then have to decide if it looks best in HDR, or processed as a single photo. Despite some tutorials out there, I don't believe you can create the 'HDR look' in Lightroom, or other non-HDR specialist software. Even if you are processing a single RAW image, the only way I believe to get the HDR look, is to tone-map it in Photomatix, or some other HDR software. I don't think this shot would have worked as an HDR, and to be honest there was no need really. I was happy to bring the most out of the scene, without giving it that artistic look time.
I processed it entirely in Lightroom, and have displayed my setting below that I used to achieve the final image:

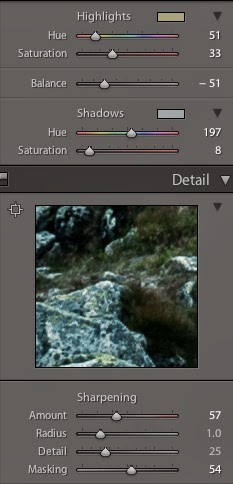
Bringing down the highlights and opening up the shadow areas, helps you bring out the most of the dynamic range, and I often adjust the whits and blacks to refine the highlight and shadow areas. It just helps bring the realism and contrast back. Clarity I think adds the drama to the scene, the highlight and shadow colour settings, give it the colour tone I was after. I have no hard and fast rule for sharpening, except for zooming in and dragging the slider along until I feel it is just right. I always add masking though, to make sure that it sharpens the necessary features, and not a blanket sharpening job.
Hope you have enjoyed that quick look into the making of this picture, I will definitely look to include more of them in future.
I agree with your comments regarding the processing of single RAW images Pete, I think if you want that HDR look then Photomatix is the way to go. I really like the muted silver/green tone in this picture, it looks like a great place to hike to!
ReplyDeleteNice to see your processing steps as well here! I must admit I've been a bit lazy publishing my steps recently. I remember when I was starting out I was always looking for sites that had this sort of information.
Many thanks for the comment Tim! Yeah although I want to focus more on the photography than 'training', it is something I can see myself doing a bit more of this year. I always enjoy seeing how people came to their final image, so it's good to treat things both ways.
ReplyDelete